Recording
Now that you have decided on a workflow, we can start recording!
Manually Setting Inputs
Use Mission Control C to set recording inputs and panning manually or automatically based on track name. For automatic assignment, add text like "Left", "R", "Pair", "2ch" etc. as a suffix and press Auto Rec Inputs.
Primary and Secondary Recording Paths
By default, ReaClassical creates a media subfolder within the project directory to serve as the primary location for storing audio files. If a secondary recording folder is specified, all tracks are automatically configured to use it. To set the secondary recording path or change the primary path, open Project Settings by pressing P, then select the "Media" tab.
Easy Steps to Record
- Select a parent track of a folder
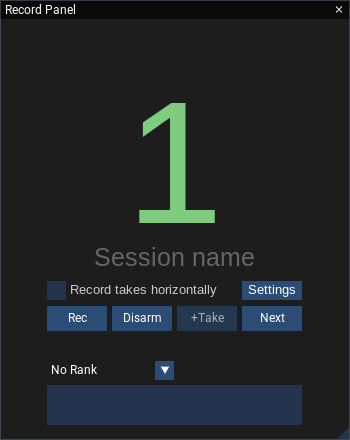
- Press F9. This opens the ReaClassical Record Panel (also available directly via Alt+Enter) and arms the selected folder. Optionally set a session name by clicking the "Session name" text beneath the take number and typing.
- Monitor your signal
- Use the left-most buttons in the panel (or F9 again) to control recording, pausing and stopping
- Add ranking and notes while recording or after the fact
- Once all recording is completed, close the record panel (automatically disengages record-armed tracks).
Screen reader users (Clara)
No panel is needed: pressing F9 starts the Record Panel Daemon, which runs in the background and keeps track of everything the Record Panel does for sighted users (take counter, session name, scheduled recording and so on). Press F9 to arm the selected folder, again to start recording and again to stop. Hear the current input and status with the Mixer Mode announcement scripts, and use ! to repeat the last announcement. Set the session name, take number, scheduled start/end/duration, overlapping takes, horizontal takes and clip reporting in Accessible Recording Settings (Ctrl+Alt+Shift+R). When recording is finished, close the daemon with Close Recording Session (Ctrl+Alt+Shift+F9). See Using ReaClassical with a Screen Reader for setting up Clara.
Tip
There's no real need to position the edit cursor before starting to record as the arm/record function will automatically move the recording start position to after the final item in the armed folder.
Distributing Takes On Location
When you are recording on location, you can hand every take recorded so far to the musicians or the producer without leaving the session. Use Distribute Takes (Ctrl+Shift+D, called Quick Export Recorded Takes in the ReaClassical menu). It builds one region per take (for each folder, in either workflow) and renders each one through the mixer to the master as WAV, FLAC, Opus 160 or MP3 320, using the sample rate, bit depth and dither you choose for WAV and FLAC (Opus and MP3 keep their own fixed settings). The files go into a subfolder of Exports/Distribute_Takes named for the format and settings, so exporting again at a different rate or format never overwrites an earlier export. Folders other than the one being rendered are muted for each pass, and your mute states are restored afterwards.
Screen reader users (Clara)
Ctrl+Shift+D opens an accessible version with two rows, Render Settings (sample rate, bit depth, dither) and Export (choose the format and press Enter to render at once). It always exports every take; there is no track-range prompt.
Additional Notes on Record Panel
Session Names and Take Numbers
To set a session name, click the greyed "Session name" text beneath the take number in the Record Panel (only possible while stopped), type a name and press Enter (or click elsewhere). Press Esc to cancel. To remove the name, click it, delete the text with backspace and press Enter. Note that if you create a new session name, the take number will automatically be reset to 1. If you switch to an existing session name with recorded takes, the take number will be calculated accordingly.
Ranking and Notes
During recording, any ranking or notes added will affect the item created immediately after recording finishes. When transport is stopped, if no items are selected, ranking and notes affect the last recorded items. Apply ranking and notes to previous items in the timeline by selecting them.
Other Buttons and Options in the Main Window
Click the take number (after confirming) to recalculate the take count, and use the Settings button for the options described in Record Panel Settings. Use +Take (Shift+F9, also while recording) to quickly increase the take number (useful for a false start, for example). Press Next (Alt+F9) to start a new recording section. This means that in vertical workflow the first source folder is rec-armed and in both workflows, the edit cursor is placed 5 seconds after the final item in the project. Enable "Record Takes Horizontally" while in vertical workflow to record takes left to right on a single folder. This is useful, for example, if you prefer to have each folder contain takes for just one piece of music. In this instance, Next acts as a sort of carriage return and arms the next folder down as well as move the edit cursor to the start of the timeline (or after any existing material).
Record Panel Settings
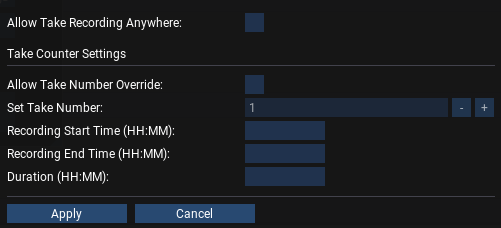
Click the Settings button in the Record Panel to open a popup with the take number, scheduled recording and take placement options described below.
Allow Take Recording Anywhere
This setting overrides the default safety feature of only allowing new recorded items after the final item on the folder. This is useful if you record musical material out of order and wish to place new items at an arbitrary position on the project timeline.
Scheduled Recording
To start (and optionally end) a recording at specific times or manually start a recording to end at a certain time or after a certain duration, click the Settings button on the Record Panel window and add the appropriate entry or entries in HH:MM format. After pressing Apply, the Record Panel window will display information above the take number. If you enter a start or end time earlier or equal to the current time, the function will assume a next day schedule and will annotate the time with an asterisk (*). Likewise, with both a start and end time, if the end time is earlier than or equal to start, it will assume a time 24 hours later. Don't forget to arm your tracks before walking away!
Overriding Take Numbers
You shouldn't need to use this but there are cases where you might want to start a new ReaClassical project but continue from the previous day's last take number. To do so, check the "Allow Take Number Override" option and set a new take number. Note that it will not allow you to set a number lower than already used.
Remote Recording via web interface
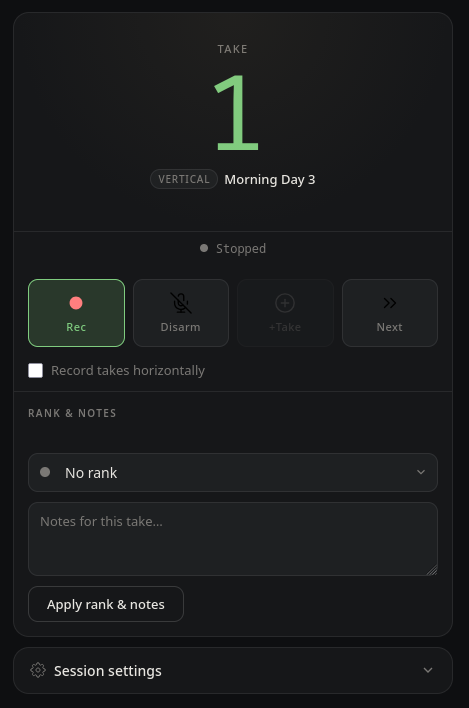
The ReaClassical Remote is a browser-based control panel that mirrors the Record Panel's core functionality, allowing you to arm tracks, start and stop recording, manage takes, and apply rankings and notes from a phone, tablet, or laptop anywhere in the room. To set it up, enable REAPER's built-in web remote by opening REAPER preferences O and navigate to Control/OSC/web and add a new web browser interface from the drop-down. Select ReaClassical_remote.html from the default interface drop-down and click apply. This same options page displays a ready-made access URL. Simply open that in a browser on any device connected to the same local network. Once connected, the Arm/Rec/Stop button, Pause/Disarm, +Take, and Next Section buttons all behave identically to their counterparts in the Record Panel window, and the take number display is kept in sync with the running panel. Session settings including start and end times, duration, and session name are read from REAPER on first load and can be edited and applied back to the running panel from the Session Settings section at the bottom of the page. Rank and notes can be set remotely and will be applied to the last recorded items exactly as if you had used the Record Panel directly. Note that the Record Panel Lua script must be open and running for the remote to function correctly, as it acts as the bridge between the web interface and ReaClassical's project state.
Meterbridge
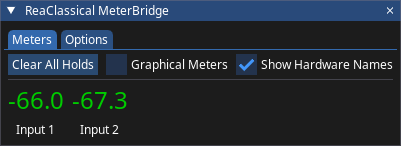
Use B to open the Meterbridge. The default view shows numeric peak holds. When tracks are record-armed, the main window displays recording inputs. During auditioning of material, the top rows show mixer tracks and the bottom any special tracks including RCMASTER and Master tracks. To switch to graphical meters, check the "Graphical Meters" option. Under the options tab, you can set color thresholds for yellow and red. To switch to channel numbers instead of hardware names, uncheck the option while tracks are rec-armed.
Recording Indicator
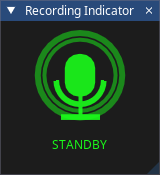
The recording indicator (Alt+R) is designed to be placed on a secondary monitor full screen so in situations where engineers are located in a separate control room, musicians are aware of when recording is active. Right-click to set custom colors for offline, standby, recording and pause.
Live Bounce
To record the rough balanced mix as a stereo file at the same time as individual channels, add a live bounce track via Mission Control. Note that this is only available in a horizontal workflow given the necessity to record left-to-right on the time line to align with the folder recording.
Listenback
To hear verbal feedback from a musician far away from the recording setup (for example, an organist in a loft), add a listenback track via Mission Control. Set the desired input channel via the dropdown. Monitoring will automatically mute during playback and recording. To set monitoring to always on, open the FX panel on the listenback track and set the dropdown in the monitoring JSFX to "Always On".
Splitting items into subtakes
To split a selected item into numbered subtakes, add generic markers via M at the desired locations and press Shift+S to split. To name a marker, press Alt+M (REAPER's insert and/or edit marker) and use the name instead of subtake numbering. Ctrl+M deletes the marker nearest the edit cursor, Ctrl+Shift+M moves the nearest marker to the edit cursor and Ctrl+Shift+G deletes all generic markers.
Monitoring and Playback
- Toggle Monitor (Ctrl+Shift+A) cycles input monitoring on all the input tracks that are not disabled for recording: off, on, then tape mode. The new state is announced.
- Toggle Playback (Ctrl+Alt+Shift+P) mutes or unmutes the playback track (see Navigating a Project). The playback track is created muted, so this unmutes it for monitoring.
- Take Number Display (Alt+T) shows the current take number in a small window. It is started automatically by the Record Panel Daemon in the screen reader recording workflow, so that a sighted colleague can see the current take.
Headroom
REAPER's peak indicators are reset automatically each time recording starts, so the peak values you see afterwards belong to the current take. Again, I refer you to the books on classical music production but in general I suggest aiming for around -12dB peaks on the meters. 24-bit recording allows for a lot of headroom so there's no need to push close to 0dB. Adjust the individual mixer track faders to balance. When using a 32-bit float device with dual AD converters as an interface (such as the Zoom F-series), ensure that the recording file format is switched to 32-bit float via project preferences P. The recorded levels might seem too low or too high during recording, but they can be easily adjusted afterward in ReaClassical without introducing any extra noise or distortion.
Recording Safety
When using the Record Panel for recording (essential!), there is increased safety when using classical take recording via the automatic switch to a restricted set of keyboard shortcuts. In addition to using the record panel, you can also access various non-disruptive functions like zooming.
Overdub Recording
To record additional material after the fact (say a separate narration track or an organ part in a church after the main recording session in a concert hall), edit the orchestral material as usual and use a mixdown as a guide track in a new project (or new project tab). To achieve this, use a vertical workflow (convert if necessary via Mission Control C), add a Reference track also via Mission Control and set the ReaClassical Project Preferences option REF = Overdub Guide to checked (F5). With this setting, audio on the guide track will be audible during take recording and auditioning of folders. Use Classical Take Recording via the Record Panel as normal. You can then S-D edit and mix the overdub material to fit with the orchestral mixdown or, if further mixing and mastering work is required on the original multi-track material, bring the organ part into that project as a new track in the folders (see below).
Manipulating Tracks During a Recording Session
Screen reader users (Clara)
Use Accessible Track Setup to add, delete and reorder tracks (including aux and submix tracks) from the keyboard instead of Mission Control.
Disabling Channels
In a typical recording session, the musicians with the least to record are often allowed to leave the session early once their work is completed. If they were individually recorded using a spot microphone, it wouldn't make sense to continue recording on that channel. The ReaClassical way, both easy and visually obvious, is to open Mission Control C and check "Rec Disabled" for the particular channel(s). When arming and recording, these channels will now be excluded. This allows the user to maintain hardware connections that were originally set up with the ability to quickly bring the microphone back in as required.
Adding a New Microphone Mid-Recording Session
You can add a track to all folders in the project at once via Mission Control. It will prompt you for a name and then add a new track with that name to the end of each folder. This also works for a single folder while working in a horizontal workflow.
Deleting tracks
In both horizontal and vertical workflows, you can use Mission Control to quickly delete child tracks from all folders of the project.
Re-ordering tracks
In both horizontal and vertical workflows, you can re-order the mixer tracks by selecting the track in Mission Control and using the arrow buttons. This also moves all audio and assigned recording inputs. Aux and submix tracks can be moved up and down in the same way.
Audio Calculator
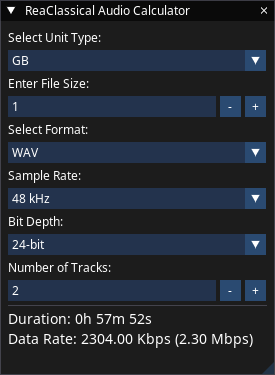
To figure out required disk space for a duration of audio or vice versa to figure out maximum duration of audio you can record based on available disk space, use Shift+H to open a calculator. You can set units, channel count, samplerate, bit depth and format (WAV or MP3 at various bitrates).
Screen reader users (Clara)
The Accessible Audio Calculator offers the same calculation as a keyboard-driven window.