Importing
While it is always better to record in ReaClassical for traditional recording sessions, you may prefer using a portable recorder for live performances. Further, you might need to import audio recorded by other engineers who used a different DAW.
Smart Import
Smart Import brings in audio files that follow a simple naming scheme, working out the track, take and (optionally) session from the filename. It handles both ordinary mono and stereo files and multi-channel files from portable recorders (see Multi-Channel Files from a Portable Recorder).
File Naming
The take number must be at the very end of the filename, just before the extension, preceded by an underscore. The "T" (for take) and any zero-padding are optional. The part of the name before the take number is split at underscores: the last part is the track name and anything before it is the session name. Examples (where x represents a digit):
sessionname_trackname_Txxx.wavsessionname_trackname_xxx.wavtrackname_Txx.wavtrackname_xxx.wav
Examples of good filenaming include:
morning_cello_012.wav(session "morning", track name will match "cello", take 12)day1_morning_cello_012.wav(session "day1_morning", track name will match "cello", take 12)harpsichord_T4.flac(no session name, track name will match "harpsichord", take 4)
Examples of bad filenaming include:
005.wav(no track name)violin56.wav(no underscore before the take number)
WAV, FLAC and AIFF files are imported. A file named roomtone.wav is always ignored, as it is reserved for room tone.
Important
Don't skip this renaming step if you want to import files easily from another DAW! Manual import by dragging in material can be time-consuming and may not allow you to use functions like searching by take number.
Importing
- Ensure that you have first created a horizontal or vertical workflow ReaClassical project.
- Copy or move source material into the media subfolder inside your ReaClassical project folder (you can also assign a custom import/recording path via Project Settings P). Subfolders are searched too.
- Either leave the track names blank (recommended) or ensure that track names in the project match the track text in the filenames. If your filenames also contain a session name prior to the track name, the items will be grouped accordingly.
- Via the top ReaClassical menu, click on Project Management > Smart Import Audio or use shortcut Ctrl+Alt+Shift+I.
- Choose your options on the Named Tracks tab and press Import.
- Open Mission Control to add special tracks such as aux & submix, make routing adjustments etc.
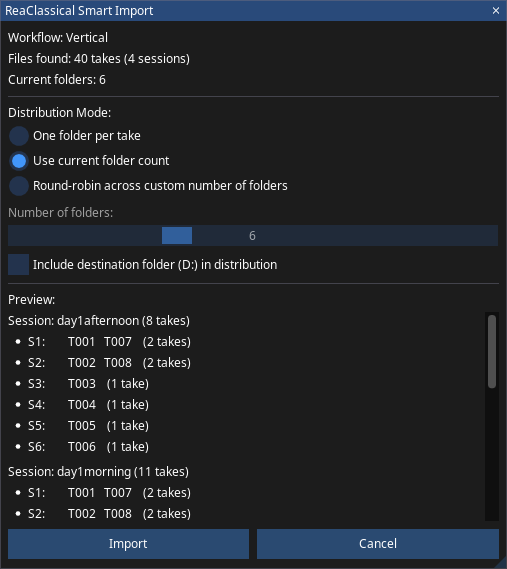
The Named Tracks tab shows the workflow of the project, how many new takes and sessions were found, and where the material will be inserted. Files already used in the project are ignored, so you can "smart" import further material into a non-empty ReaClassical project.
Material is inserted at the edit cursor. The import is built first and then, if anything already sits at or after the cursor on the folders being imported into, that material is moved later by exactly the length of the import to make room. Only the folders that actually receive imported items are affected: importing into the first source folder does not disturb the destination folder or untouched source folders. If an existing item straddles the cursor, it and everything after it move, and a one-second gap is left after the new material.
If the project's track names are all blank, you are first given the opportunity to set the order in which the captured track names are assigned to the mixer tracks by dragging rows into place.
Import only these takes (optional) lets you restrict an import to a session name and/or a list of takes such as 1-3,5,11-15.
In a horizontal workflow all takes are laid out left to right in the single folder, one session after another.
In a vertical workflow, takes are placed in source folders. Choose the Starting folder (the first source folder to use) and a Distribution Mode:
- One folder per take: within each session, the first take goes in the starting folder, the second in the next folder down, and so on. New source folders are created if the project doesn't have enough. Each further session begins again at the starting folder, to the right of the previous one.
- Use current folder count: takes are dealt out in turn across all the source folders that already exist from the starting folder downward (take 1 to the first, take 2 to the second, ..., then back to the first folder, to the right of the first round). No folders are created.
- Round-robin across custom number of folders: the same dealing out, but across the number of folders you enter, creating folders if needed.
A preview shows the result, including a warning when new folders will be created.
Screen reader users (Clara)
The same shortcut opens a keyboard-driven walkthrough, announced through Clara, with an explicit confirmation step before the import happens. If the media folder also contains multi-channel files, you are first asked to choose between Import Takes and Import Polywav.
Multi-Channel Files from a Portable Recorder
If you use a portable recorder such as a MixPre, you might have a multi-channel combined file (a "polywav"). Smart Import can split these into a set of mono and stereo tracks. The Polywav tab appears in the Smart Import window whenever the media folder contains unused files with more than two channels.
The filenames must follow the take-number rule above, with an optional session name but no track name: [sessionname_]Txxx.wav. Every polywav imported in one go must have the same number of channels.
Enter a channel composition pattern made of the digits 1 (mono) and 2 (stereo), read left to right across the channels of the file. For example:
2makes the first stereo pair, and then every remaining pair of channels is also treated as stereo21makes a stereo pair followed by a mono channel; the remaining channels are mono221makes two stereo pairs followed by mono channels for everything else
Once the digits have been used up, the last digit repeats for as many whole groups as still fit, and anything left over becomes mono tracks. ReaClassical checks that the result fits before touching your project, then distributes the takes with the same options as Named Tracks.
Importing a DDP or PMI
ReaClassical can rebuild a full CD track and album metadata layout from an existing master, for checking or remastering. Use a fresh ReaClassical project whose destination folder is empty.
- Project Management > Import DDP (Ctrl+Alt+Shift+D): choose the DDP's raw audio stream, a file with a
.DATextension (conventionallyIMAGE.DAT) - Project Management > Import PMI (Ctrl+Alt+Shift+M): choose a Pyramix
.pmipre-master
Manual Import by Dragging
- In your source folder, select items that should be aligned vertically (for example, every channel for particular take) and drag into the ReaClassical project being sure to drop onto one of the folders created by ReaClassical with a track count that matches the number of files you selected. Choose the option "Same time position on separate tracks"
- Continue as above for each take
- Open Mission Control C to add special tracks such as aux & submix, make routing adjustments etc.