
Mastering
Mastering in ReaClassical is game-changing. Many features described here are not available in any other classical DAW. I hope that the ReaClassical way saves you much time and helps you look forward to the mastering phase of the project. While automatic DDP generation, automatic room tone function, and professional album reports are the main features here, you will probably find the revolutionary mixer snapshot manager is an extremely efficient way to add auto-recall mixer scenes across your production as well enjoying the ability to quickly reorder album tracks via a simple keyboard shortcuts.
Tip
If working in horizontal workflow, ensure that there is over a minute's worth of empty timeline between the end of the proposed album and any other source material. Instead, you can also choose to convert to a vertical workflow via Mission Control C.
Basic Mastering Workflow
- The album is built on the first (destination) folder, so make sure your finished edit is there
- Remove all names from items on the parent track aside from those you want to be track starts. You can clear all items on the folder track via Ctrl+T
- Enter track start names via the Notes window N
- Press Y to open the metadata editor
- Once happy, use the Render buttons along the bottom of the metadata editor (see Rendering).
Note
In order to make the process as streamlined as possible for the user before the metadata editor window opens, on first run generic albumwide metadata (the name starts with "@") is added to an unnamed item on the parent folder. If that is not possible, a transparent split is made on the final item of the album.
Metadata Editor in Detail
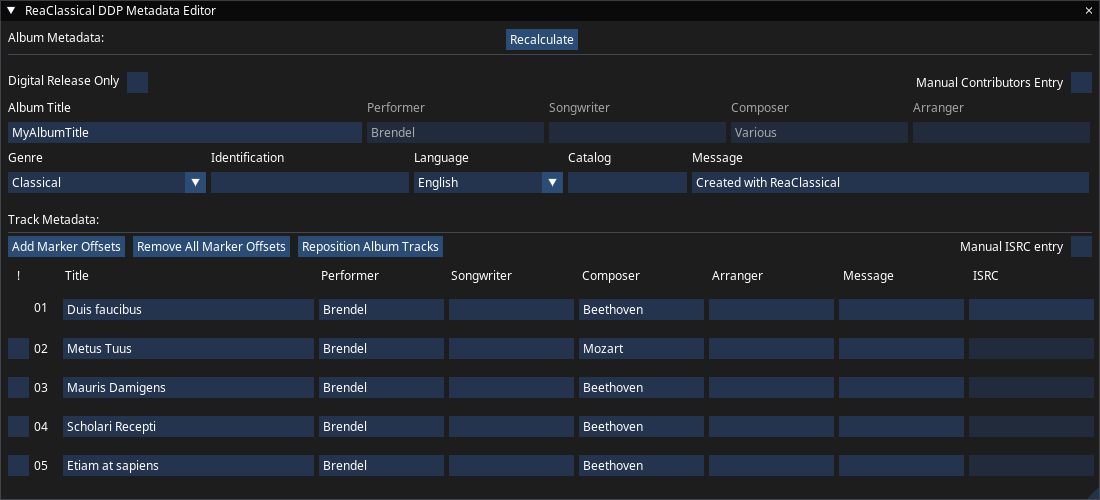
The metadata window allows you to enter all track and album metadata in a single place.
- Album metadata: title, performer, songwriter, composer, arranger, genre, identification, language, catalog (EAN/UPC) and message
- Track metadata: title, performer, songwriter, composer, arranger, message and ISRC for each CD track
ISRC values are filled in automatically from the first track's entry, and the album-wide performer, songwriter, composer and arranger values are filled in from one or more entries in the track table. Check Manual ISRC entry or Manual Contributors Entry to override either. Right-click a field to copy its value to all tracks, to all later tracks, or from the album. Invalid ISRC and catalog entries are refused.
Screen reader users (Clara)
Y opens the accessible DDP Metadata Editor. ↑ and ↓ move between the tracks, Render Settings, Render, Album and CD Settings, and ← and → choose which metadata type (title, performer, songwriter, composer, arranger, message, ISRC) is read out for the current row. Enter edits the current cell and stops, so pressing ↓ and Enter repeatedly fills in one field down every track. Ctrl+A applies the current value to every track, Ctrl+R to this and the later tracks, Ctrl+P copies the previous track's value and Ctrl+U copies the album's. Read-only cells, such as the automatic album contributors or the automatic ISRC on tracks after the first, announce why they cannot be edited. CD Settings covers digital release, manual ISRC, pre/post roll and marker offsets.
Tip
Check the "!" box for CD tracks that you would like to have a visual countdown (length set in F5 prefs). This feature is not available in all CD players.
Recalculate
After moving CD start (named) items on the timeline, press Recalculate to refresh marker positions.
Digital Release Only
For those wanting to export individual media files only, check the "Digital Release Only" checkbox to ignore the CD offset value set in F5 preferences as well as disable the automatic snapping of markers and regions to CD frames. Then render with the WAV, FLAC, Opus 160 or MP3 320 buttons at the bottom of the editor.
Note
When this mode is enabled, you can still set manual marker offsets using the buttons in the metadata editor.
Repositioning and Re-arranging Album Tracks
There are two functions which help with reordering or repositioning tracks. First, and perhaps most useful for producing a classical album, is if you decide that you need to reorder one or more tracks. Select the named item you want to move either in the arrange window or metadata editor (by clicking on the track number) and press Move Album Track Up or Move Album Track Down (Ctrl+← and Ctrl+→ in the arrange window) to switch with the track immediately above or below it in the list. Note that gaps are preserved too. The other situation is when you want to start with uniform gaps between a series of short separate pieces. Use Reposition Album Tracks (Ctrl+Y) and enter a value in seconds. Your pieces are then automatically spaced and items crossfaded are left intact.
Marker Offsets
There may be instances when an audience member coughs right before a downbeat or a violinist hits strings before the first note of an otherwise excellent performance. The Add Marker Offset function allows you to adjust the start accordingly (assuming you have some nice recorded or generated roomtone on the dedicated roomtone track). To use, manually drag one or more CD markers to where you want them and then click Add Marker Offsets. It adds the correct offset(s) to the item name(s) automatically and refreshes the album metadata editor. Now, adjustments to an item position followed by a press of Y, maintains the relative CD marker offset to the item start. To remove all marker offsets, click Remove All Marker Offsets.
Multi-Disc Albums
Each disc is mastered as its own project, because the album is always built on a project's first folder. Make a project (or a project tab) per disc and run through the workflow above in each one. To compile material from several projects, see Multi-Project Tab S-D Editing.
Other Mastering Tips
CUE File and Reports
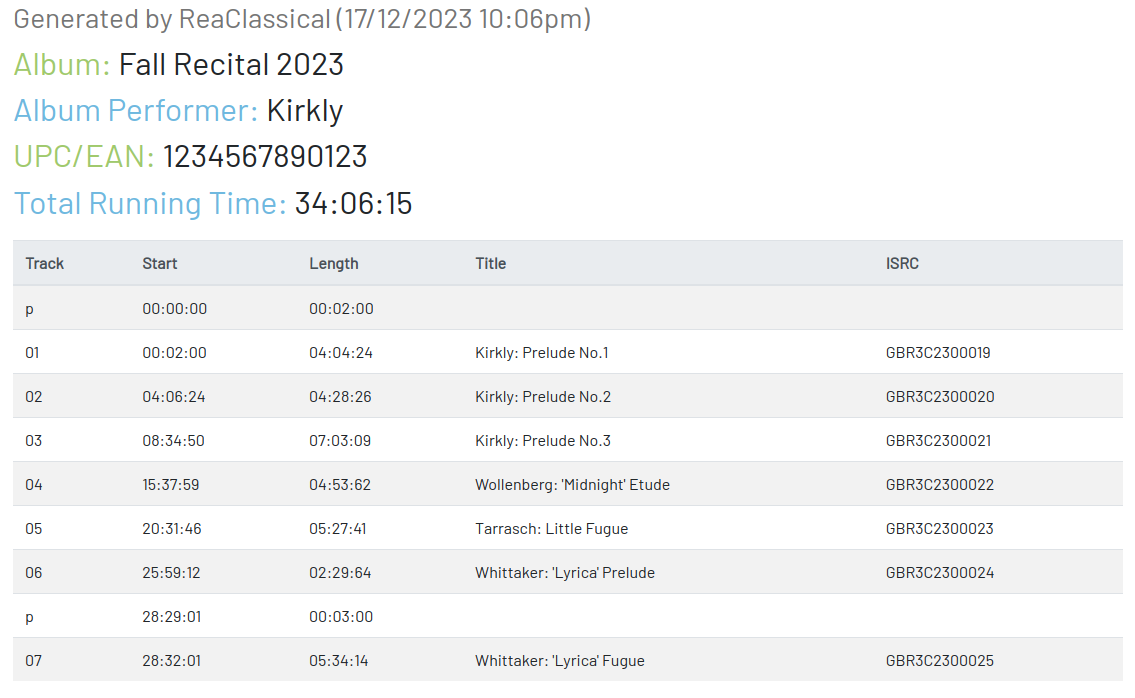
The Exports folder in your project folder collects the album listings: album_report.html and album_report.txt, and a complete technical metadata.txt file (useful for sending to a duplication/replication factory). A CUE file and a CD-Text (.cdt) file are written to Exports/Audio+CUE, next to the audio file made by the Cue Audio render button, so the CUE file's reference to the audio always resolves.
BIN+CUE set
Create a BIN/CUE pair (either select regions define tracks and render the whole project or select use only # markers and render by time selection if you don't want the first pre-gap as actual silence at the start of track 1).
Peak and Overs Check
Press Shift+P to scan every unmuted track that contains items. The window reports the highest peak level and its position, with a Go to Peak button, and lists every point at or above an over threshold (dB) that you set, each with a Go to button. The scan accounts for item and take volume (including a drawn volume envelope, if SWS is installed) and the faders along the routing chain up to RCMASTER, so it reflects the level arriving at the mix bus. Press Re-scan after making changes.
Screen reader users (Clara)
Shift+P opens an accessible Peak and Overs Check. On opening and on every rescan it announces the peak position and the number of overs and moves the edit cursor to the peak. You can then browse the overs one at a time, hear each over's level, position and track, and audition the peak.
CD Player
Press Ctrl+Alt+Shift+Y to play the album back like a physical CD player. The disc is always the first (destination) folder, and only it is heard. The player is a small window that needs keyboard focus, with buttons that mirror its keys for mouse users. When you switch it off with Escape, the cursor returns to where it was before you opened the player.
| Key | Action |
|---|---|
| P | Play, pause or resume |
| S | Stop, returning to the start of the disc |
| → / ← | Next track / previous track (restarts the current track if you are more than 3 seconds into it) |
| ↑ / ↓ | Fast forward / rewind |
| D | Enter a track number (more than one digit allowed) |
| 1 to 9 | Jump straight to that track |
| T | Cycle the time display: track elapsed, track remaining, album elapsed, album remaining |
| R | Cycle repeat mode: off, track, album |
| B | Toggle Transition Review |
| W | Set the pre-roll and post-roll for Transition Review |
| H | List these keys |
| Escape | Power off |
Transition Review plays only the joins: the start of the album, every transition between tracks, and the end of the album, each with a pre-roll before and post-roll after (10 seconds and 3 seconds by default). It is the quickest way to hear every splice and gap in a finished album without playing it through. The pregap before track 1 is not included. It reports "Nothing left to review" when it has played the last boundary.
Screen reader users (Clara)
The CD Player works fully from the keyboard and is announced: it says "Reading disc...", the track and time as you move, "Paused" and "Resumed", "No track N" if you ask for a track that does not exist, "Last track" at the end, the review pre- and post-roll values, and "CD Player off" when you close it.
Loudness
In terms of loudness, I personally aim for about -18 LUFS Integrated for my classical albums though it can be as high as -16 LUFS and as low as -20 LUFS. The new loudness JSFX meter in REAPER and my own ReaVision Metering Suite along with the normalization of loudness and true-peak limiting in the render dialog are priceless. It's another reason I couldn't go back to the other classical DAWs at this point.
Further information on DDP
For more information about DDP metadata see here (also available via the Render dialog via Format > DDP and clicking on Help).