Editing
Source-destination editing is truly anywhere to anywhere. This means you can place your source and destination marker pairs on any folder.
Editing Step-by-Step
Ensure that the folder where you want to place the marker pair is selected. The best way to do this is to click on the item where you want the marker. Note that in F5 preferences you can set placement at mouse hover meaning that the desired folder is chosen based on hover position.
- Set destination IN and OUT markers via 1 and 2
- Set source IN and OUT markers via 3 and 4
- Press 5 to make the source-destination edit (2-, 3- or 4-point edit depending on how many markers you set), or F4 to make a time-stretched S-D edit (requires all 4 markers), or if only using destination IN marker and both source markers, F3 for an "assembly" or 3-point "insert" edit
- To finesse the edit, click on the right item of a crossfade pair and press F
Screen reader users (Clara)
Every marker and edit action announces what it did. If you place a marker on the wrong side of its partner (a source OUT before the existing source IN, for example), ReaClassical deletes the stale marker and says so, so an edit can never silently take far more material than you intended. Use Ctrl+1 to Ctrl+4 to move to each marker and the audition keys described in Auditioning to hear them. For crossfades, see Crossfade Editing for Screen Reader Users.
Coloring and Fixing Takes
There is no separate "prepare takes" step before editing any more. ReaClassical's editing functions find the matching items on the other tracks of a folder by midpoint matching rather than relying on explicit group IDs, and empty items are cleared out automatically each time Mission Control opens.
- Auto-color project (Shift+K) colors items by take number or folder. ReaClassical runs it for you at the points where it is needed; run it yourself after importing material by hand. Set No Auto Item Coloring in the F5 preferences to switch it off.
- Fix Crossfade Sequence Edits (Shift+X) repairs items that should be grouped but have become misaligned across the tracks of a folder, for example because ripple-per-track was switched off by accident while dragging items. Select any one of them, run it and choose which track has the correct edits. Every other track in the folder is rebuilt across that group from the reference track's edits, re-pointed at each track's own audio file for the same take number.
Crossfade Editor
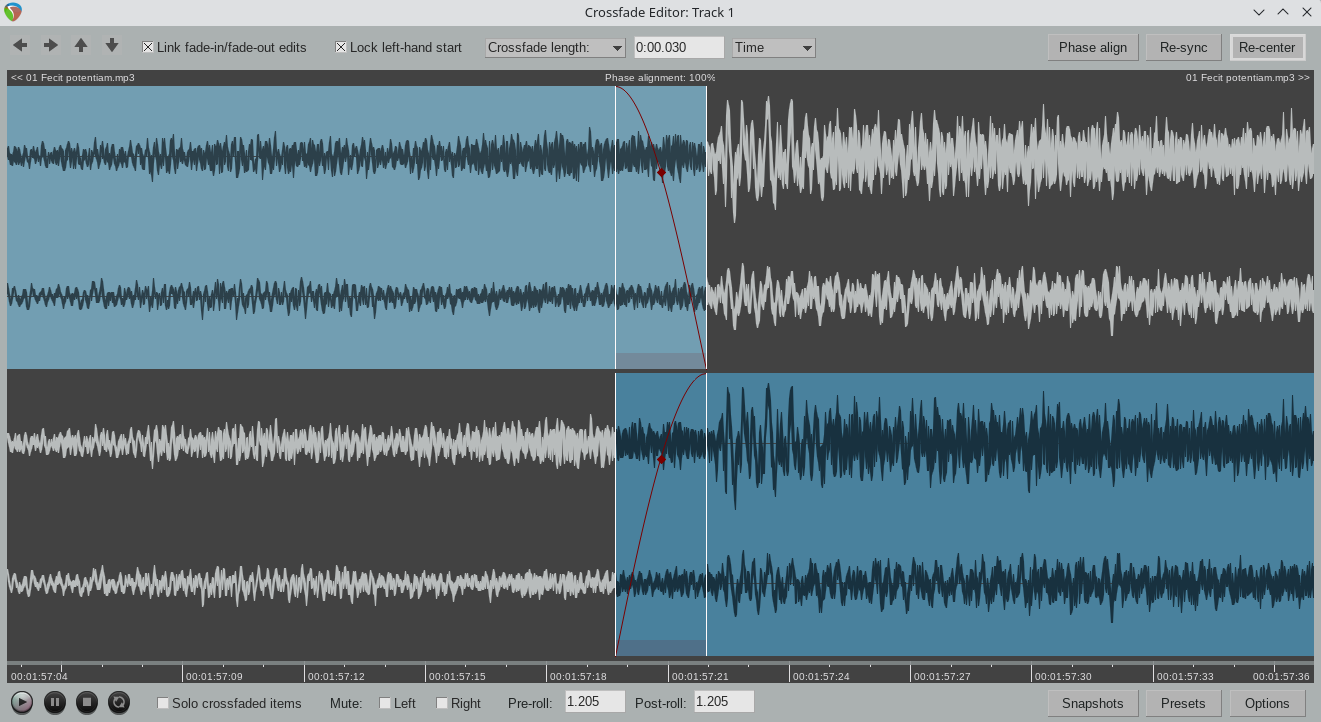
Since v7.40, REAPER includes an excellent professional two-lane crossfade editor similar in nature to the specialist classical DAWs such as Sequoia and Pyramix. With the improved crossfade editor, users can see the continued "ghost" waveforms of the items beyond the crossfade they enter and likewise the previous waveforms of the items that exit the crossfade. The ability to visually align transients and then position the crossfade just before it is absolutely critical (and fun when you have the tools to do it!). Select the right-hand item of a fade (or hover over the item if Add S-D Markers at Mouse Hover is set in the F5 preferences) and press F to enter crossfade editor mode. Press F again to leave it. The two-lane editor has its own keyboard shortcuts for auditioning and navigating. To audition material, hover the mouse inside the crossfade window and:
- Press A to audition the crossfade with mirrored pre/post roll based on mouse cursor location
- Press S to audition just the left item based on mouse cursor location or its mirrored position
- Press D to audition just the right item based on mouse cursor location or its mirrored position
Use Shift+A, Shift+S or Shift+D to do the equivalent but with a custom playrate as set in F5 preferences. Other shortcuts include:
- Press E to audition just the top lane based on mouse cursor location or its mirrored position
- Press C to audition just the bottom lane based on mouse cursor location or its mirrored position
- Press Alt+S to audition just the out-of-bounds material left of the xfade
- Press Alt+D to audition just the out-of-bounds material right of the xfade
You can shuttle between crossfades using the Q and W shortcuts (or ← and →). Please see the REAPER manual for more details of what is possible including phase alignment and various view options.
Crossfade Editing for Screen Reader Users
Screen reader users (Clara)
REAPER's two-lane crossfade editor depends on seeing and dragging the waveforms, so it is not usable with a screen reader. With Clara installed, F starts a keyboard-driven crossfade mode instead, which gives you the same control over the crossfade: nothing is lost. See Crossfade Mode for all of its keys.
Source Audition Manager
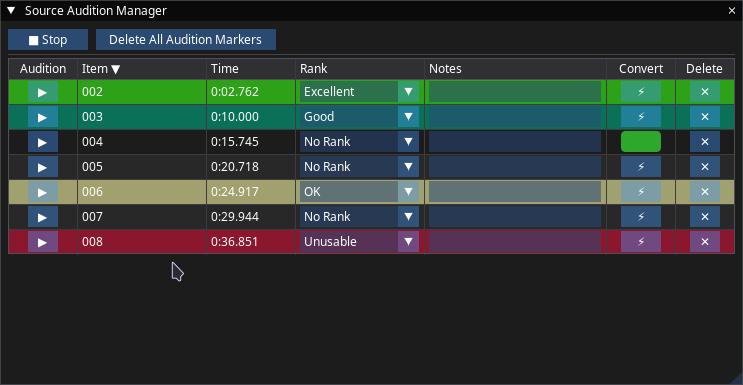
When making a source-destination edit, you may not have a list or annotated score from the musicians or producer showing preferred edits. If the decision is left to the audio engineer, this process is very straightforward. First set the source audition mode to checked in F5 preferences. Then, open the Source Audition Manager via the Source Audition button in Mission Control or the Z shortcut. To set up all the source audition pairs, set multiple sets of source in and out markers. You will note that when you start to add a second pair, the source markers are transformed into a take marker "region". The only limitation is that you can only have a single take marker region set per item. This allows the user to quickly reposition the S-D markers by simply setting new ones. If your recorded items each contain multiple passes of the same musical material, consider splitting them via the S shortcut. Use the controls in the window to audition, rank and add notes. Once you have settled on a best take, press the convert button (or place edit cursor within a take marker region and press Alt+Z). Note, that any existing real source pair is converted to a take marker region. Assuming one or more destination markers are already set, you can press 5, F3 or F4 to make the desired edit. Sometimes the suitability of source material is difficult to judge until it is heard with the surrounding destination material. Given that all source markers are stored as take marker regions if inactive, it allows the user to quickly undo an edit and switch to an alternative pair. During auditioning, you can delete individual pairs via the X on the specific table row, as well as delete all source audition markers by clicking Delete All Audition Markers or pressing Alt+Delete.
Other Editing Tips
Making a Crossfade by Hand
If two items on a parent track overlap, place the edit cursor somewhere within the overlap and press X to crossfade them. The crossfade uses the S-D Crossfade Length from the F5 preferences (35 ms by default) and is applied to every track in the folder. You can then refine it in the crossfade editor with F.
Healing Edits
Select a "patch" edit (one involving all 4 markers over the top of a best take, for example) and press Ctrl+H to heal the edit (restoring the underlying material without splits).
Tip
This works at any point in the editing process and isn't restricted to the last edit made.
Finding Source Material
The items representing a S-D edit are colored according to the source material. However, you can also easily locate source material by clicking on an edited item and pressing Ctrl+F. A color-coordinated source IN and OUT marker pair are placed at the source location and in vertical workflow mode, the associated folder is selected. This function also works across multiple project tabs.
Set Item Playrate with Ripple
This function, run via Shift+R, allows you to change the playback rate of a selected item, automatically rippling all subsequent items within the same folder to maintain the integrity of your edits. Select a single item on the folder track, enter a percentage value in the input box, and press Apply & Ripple. In relative mode (the default), the value is applied as a percentage change relative to the item's current rate — so entering 5 makes the item 5% faster than it currently is, while -5 makes it 5% slower. In absolute mode (enable the "Absolute rate" checkbox), the value is always relative to normal speed — so 5 always results in a rate of 1.05x regardless of the item's current rate, and 0 always restores normal speed. The Reset to Normal Speed button is a convenient shortcut to return the item to 1.0x playback rate. Pitch is always preserved during time-stretching. Note that only one item may be selected at a time, as each item requires its own independent ripple calculation. The window also includes a Pitch Adjustment section for correcting intonation without affecting item length or requiring any ripple. Enter a value in semitones and press Apply Pitch — positive values raise the pitch, negative values lower it, and fractional values are supported for fine adjustments (e.g. 0.5 for a quarter-tone). The Reset Pitch button returns the pitch to 0.0 (no adjustment).
Screen reader users (Clara)
With Clara installed, Shift+R opens the accessible Playback Rate window, a keyboard walkthrough that makes the same rate and pitch changes with the same rippling. Press H in it for examples that fit the current relative or absolute mode.
Automatic Crossfade Protection
When performing S-D edits, deletions or ripple deletes, ReaClassical automatically detects any existing crossfades that straddle your marker boundaries and consumes them as part of the resulting edit. This prevents stray partial fades being left behind in your project. This is also useful when quickly iterating through alternative source material: since destination markers persist after an edit and are placed at the exact edit bounds, you can create new source markers and immediately re-edit without worrying about crossfade debris accumulating at the destination boundaries.
Marking Edits on your Scores
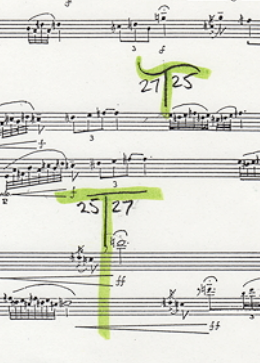
This is best done using a physical, photocopied score by the conductor or lead musician. I advocate for a “T” system where a large T is inserted into the score at the intended edit point. Either side of the T stem, and under the crossbar, the outgoing and incoming take numbers are written. A wavy crossbar indicates some leeway for where the edit point can be placed. Further notes can be attached underneath the T such as directions for tightening the gap etc.
Multi-Project Tab S-D Editing
If you'd like to S-D edit between various open project tabs you can set both the source and destination project markers via Ctrl+Alt+1 (or Ctrl+Alt+2) for destination and Ctrl+Alt+3 (or Ctrl+Alt+4) for source (essentially the same numbers associated with regular S-D markers). The markers can exist anywhere on the tab's timeline but perhaps the very beginning or end would be good to keep them out of the way. The S-D editing itself then works just as for a single tab other than any source markers that are set are not deleted to aid quickly undoing in the destination tab and being ready to reapply the edit. The only rule when using S-D project markers is to ensure that source or destination markers should be paired with the corresponding source or destination project marker. This workflow would, for example, allow you to have multiple project tabs (perhaps one for each symphony movement plus a final destination tab), allowing for both internal editing per tab but after setting the S-D project markers compiling the final edit in the destination tab. To delete all the S-D project markers press Shift+Delete. Also, in multi-tab S-D editing, when regular markers are placed, any other existing versions in other tabs are automatically deleted to ensure that only one version of the marker exists at a time across all open project tabs.
Delete / Delete with Ripple
While perhaps not used as often as 3- and 4-point edits, I have created two functions for deletion of material. Delete & Ripple Backspace will delete the material between source IN and OUT markers and ripple material to the right backwards with a short crossfade. Delete Leaving Silence Ctrl+Backspace will also delete but maintain the silence without rippling backwards.
Copy/Move Destination Material to Source
Run either the copy Ctrl+Alt+C or move Ctrl+Alt+M version of the function from the S-D editing toolbar (no need to ensure the first track is selected) and the function will copy or move all items and edits from the destination folder directly below to a newly created source folder. This allows for saving versions of finished edits either via iteration (copying so you can continue to make further edits) or fresh (moving so you can compile an alternate version of a best take from scratch). These different edits can then be easily auditioned via A the shortcut. This is similar to a Pyramix-style iterative editing method while still maintaining the destination folder as the uppermost folder.
Promote Source to Destination
Select a source folder and press the "promote" icon in the S-D editing toolbar or Ctrl+Alt+P to promote the source folder to the top "destination" position.
Add S-D Markers to Edges of Item(s) or Time Selection
Used in combination with Delete / Delete with Ripple (Ctrl+Backspace/Backspace), you can quickly set both source markers to the edges of one or more selected items on a parent track or time selection via F12. This is a time-saver when dealing with potential sliver edits i.e. small unneeded leftover edits as a result of multiple rounds of zoomed-out S-D editing. Note that the built-in checks when manually placing destination markers should go some way to alleviating this issue which can easily go unnoticed in other classical music DAWs. Likewise you can use Ctrl+F12 to set destination markers (selected items must be in the destination folder). Note that if using time selection for placing source markers, as for S-D marker placement via 3 or 4, make sure you first have the desired source folder track selected before pressing the shortcut (a good way to do this is to first click on the item involved). You may prefer to set both source and destination markers this way over the more traditional number key shortcuts acting as a sort of hybrid between S-D and razor editing. Also note that if both selected items and a time selection exist, the time selection takes precedence.
Nudging Markers and Items
After auditioning a marker, nudge it with Ctrl+, (left) and Ctrl+. (right). Selected items are nudged with Alt+, and Alt+.. Both move by the project nudge amount, which you set with the Terminal command nudge=10 (milliseconds) or under Other Settings in Accessible Preferences. The same keys with the "x modifier" (Ctrl+Alt+, and Ctrl+Alt+. for markers, Alt+< and Alt+> for items) move by the nudge amount multiplied by the modifier amount (Terminal mod=10). Each nudge is announced with the item name and the distance moved. While a crossfade is being edited in crossfade mode, use the crossfade mode nudge keys instead.
Move / Zoom to S-D markers
To move to any existing S-D markers use Ctrl+1, Ctrl+2, Ctrl+3 or Ctrl+4. To zoom to any of the S-D markers for more fine-grained placement, use Alt+1, Alt+2, Alt+3 or Alt+4. If you have multi-tab S-D editing set up, these shortcuts will also automatically move focus to the correct project tab.
Delete S-D markers
To delete all regular S-D markers, press Ctrl+Delete.
Floating Destination Folder
The floating destination folder feature enhances vertical workflow efficiency by dynamically positioning the destination folder just above the selected source folder. This reduces unnecessary vertical scrolling when setting IN and OUT markers for destination and source folders that are far apart in the project. Additionally, this feature is fully compatible with mouse hover S-D editing and when setting source markers to item edges (F12). To enable the floating destination folder, open ReaClassical Project Preferences (F5) and set the corresponding line to checked. For example, with floating destination enabled, place a source IN marker (via 3) on any source folder. The destination folder will reposition itself just above the selected source folder. Add the remaining S-D markers as required. Perform any S-D edits via 5, F4, or F3. Select another source parent and place another marker (3). The destination folder will continue adjusting dynamically. It is worth noting that if the destination folder moves above a source folder, the source marker track number correctly updates to reflect the new order. To disable floating mode, re-open ReaClassical Project Preferences and set Floating Destination Folder unchecked. This will also automatically move the destination folder back to the top of the project.
Razor Editing
Because of the potential for visual overlap of markers, I much prefer the REAPER razor edit functionality for vertical take work. It works a lot like the process shown in this Pyramix video. While Pyramix also has additional source-destination marker workflows, I couldn't help but feel that for professional ensembles that manage a high degree of tempo regularity between takes, this method can be extremely efficient. This isn't the document to introduce REAPER razor edits as there are plenty of resources online if you do a simple search. Here we are only concerning ourselves with creation of the razor area across all our pairs and spot mics (REAPER's default shortcut is the rather uninspiring Alt+Right drag). Thankfully, it can become the default editing mode by selecting the razor edit mode on the main toolbar and left-click dragging.