Project Management
Statistics
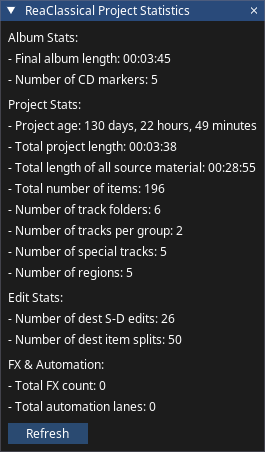
For a complete set of statistics on the ReaClassical project, either for your own information or to assist with billing a client, go to ReaClassical > Utilities > Show Statistics or use the shortcut F1. For example, you might have a billing system that charges clients based on number of source-destination edits, or mixing/mastering based on the final length of the album. Information includes:
- Album: final album length and number of CD markers
- Project: project age, session time, total project length, total length of source material, total number of items, number of track folders, number of tracks per folder, number of special tracks and number of regions
- Edits: number of destination S-D edits and destination item splits
- FX and automation: total FX count and number of automation lanes
Session time is the elapsed time (in hours and minutes) since the project's session timer was started, and can be reset to zero from the statistics window. The window also shows your ReaClassical and REAPER versions. The statistics can be copied to the clipboard.
Screen reader users (Clara)
With Clara installed, F1 opens Accessible Show Statistics, which lists the same values for you to step through and lets you reset the session timer.
Typing Notes
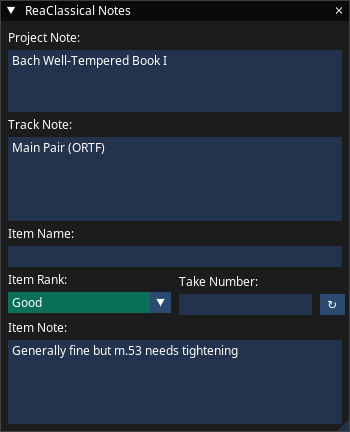
Add project, track and item notes using ReaClassical's Notes window (N, or ReaClassical > Utilities > Add Project/Track/Item Notes). For the selected item you can also set the item name, item rank and take number (with a button to reset it to the number found in the filename), as well as an item note. The take number you set here takes priority when finding takes.
Screen reader users (Clara)
N opens an accessible Notes window with the same fields. Use Left/Right (or Q/W) to move between items while it is open and Space to play and stop. Item Rank (Ctrl+R) and Item Name (Shift+N) also have their own quick windows.
Manually Coloring Items
Use the Colorize function (K, or Colorize Selected Item(s) in the ReaClassical menu) to set a custom color (or remove it) for the selected items.
Folder Structure
ReaClassical defaults to placing recorded media in a media subfolder and exports in an Exports subfolder of the project folder, making project file navigation easier.
Automatic Backups
REAPER allows for powerful and complex backup routines. ReaClassical sets REAPER's auto-save to every 15 minutes and keeps a limited number of backups. Review and modify these in REAPER's Preferences under Project > Backups to suit your own way of working, including switching to backups and auto saves for a number of unique days.
Folders and Items
- Duplicate folder (No items) (Ctrl+D) adds a copy of the selected folder's tracks as a new folder, without its items. From a horizontal workflow it first asks whether to convert to a vertical workflow
- Delete Source Folder (Shift+D) deletes the selected source folder (vertical workflow only; it asks you to confirm)
- Delete All Source Items (Ctrl+Alt+Shift+Delete) deletes every item in every source folder (vertical workflow only; it asks you to confirm)
- Select All Items in Folder (Ctrl+Alt+A) selects every item in the folder of the selected track
- Paste (Ctrl+V) pastes items and announces how many were pasted
- Remove All Item Fades (Shift+F) removes the fades from items whose edges are not part of a crossfade, leaving crossfades intact
Project Tabs
Ctrl+Alt+N opens a new project tab and Ctrl+Tab (or NumPad +) switches to the next one. Switching announces the name of the project you land on. Multiple project tabs are the way to make multi-disc albums and to compile edits from several projects; see Multi-Project Tab S-D Editing.
Cleaning
If in doubt, keep everything! Otherwise, the File > Clean current project directory is an excellent way to reduce the size of your projects. Note that when assigning a session name via the Record Panel Window, currently the above REAPER menu item doesn't search recursively. In a way, this reduces the chances of accidentally deleting precious takes. You can always manually delete but, from experience, it is much better to simply keep everything.
Archiving
There are various ways to archive classical music projects. First, you can access the Project Bay by Ctrl+B shortcut. You can then ensure that all media used in the project is contained within the project folder itself. If not, you can select as many as necessary, right click and move/copy into the project folder. After this, you can simply compress the folder as a zip and store on an external drive. A further step to guaranteeing ability to open in the future is to freeze tracks so that plugin effects are baked in (with ability to unfreeze later if possible). Alternatively you can save a copy of the project via File > Save project as..., converting to a format like FLAC and trimming the media as you wish. Finally, one to look out for in the future is Project Archiver. However, I don't believe it is quite ready for prime-time yet and recommend using one of the other methods for now.