Mixing
Mixing Scenes
- Add FX, change routing, and optionally adjust volume, panning etc via Mission Control C
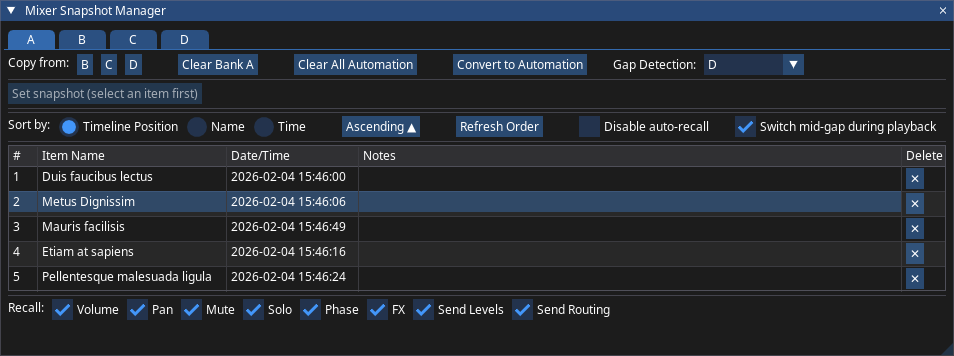
- Open Mixer Snapshot Manager via Shift+M
- Create automatically-recalled mixer snapshots tied to items.
- Before rendering, convert to real automation lanes via Convert to Automation
Note
If setting a snapshot tied to an unnamed item, the first part of the item's ID will be used as the identifier in the table row.
Mixer Snapshot Manager in Detail
General Workflow
- Click on an item that you want to be the start of a snapshot or mixer "scene"
- Adjust any mixer parameter including fader, mute/solo, pan, FX parameters etc
- Click Set Snapshot....
- To make changes, select the item or table row, tweak parameters and click the same button now re-labeled Update Snapshot...
By default, switching mixer scenes will happen in a gap in the project during playback. Disable auto recall to treat as a simple mixer snapshot tool that affects the whole project. Filter which parameters are recalled by unchecking boxes at the bottom of the window: volume, pan, mute, solo, phase, width, FX, send levels and send routing. By default a snapshot takes effect in the middle of the gap between items; uncheck Switch mid-gap during playback to switch only at the start of the next item that has a snapshot.
Snapshots can only be set on items on the first (destination) folder track, which is the track that recall and gap detection are based on.
Important
Auto recall runs while the Mixer Snapshot Manager is open. To keep it running after you close the window, check Background auto-recall, which hands recall over to a background process. Once converted to real automation points, auto recall is disabled by design and the window can be closed.
Screen reader users (Clara)
Select an item on the first folder and press Ctrl+Alt+Shift+S (Snapshot Add) to capture a snapshot, or press Shift+M, which opens the accessible Snapshot Settings in place of the Mixer Snapshot Manager.
Copying and Clearing Banks
The Mixer Snapshot Manager allows 4 independent banks of snapshots with ability to copy between banks and clear.
Rendering
The snapshot manager window relies on real time playback for auto recall. For faster-than-realtime rendering, this will lead to unpredictable results. Therefore, at render time, it is advisable to convert to real automation data. To do so, press Convert to Automation and optionally set which folder to use for gap detection (the conversion will also respect the switching mid-gap checkbox). Mixer, aux and submix tracks with snapshot data will appear in the arrange window along with any active automation envelopes. If items connected to mixer snapshots are moved on the timeline as part of editing, click on the convert button again to get instantly updated automation data. To clear the snapshot automation and return to auto recall via the window while editing and mixing, press Clear All Automation. Automation items that you created by hand on mixer, aux and submix tracks are protected: converting and clearing only replace the automation that the snapshots created.
Volume Automation
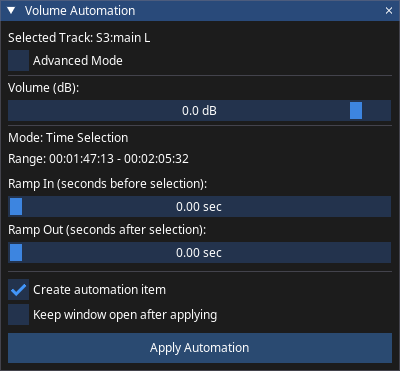
- Ensure that a "Destination" or "Source" track is selected.
- Make a time selection over the passage you want to change and press I. A time selection is required: changes that run from the cursor to the end of the piece are made with the Mixer Snapshot Manager instead.
- Set the volume level and optional ramp in/out lengths and click Apply Automation. The ramps lie outside the time selection: ramp in is the time before the selection and ramp out the time after it.
While you dial in the level you hear it immediately on playback; ramps cannot be previewed in this way. Check Keep window open after applying to make several adjustments in a row.
The first time you create an automation item, ReaClassical engages automation mode: items on the source folders are locked and ripple editing is set to all tracks, so a ripple edit on the destination folder carries the automation along with it. You can switch automation mode on and off yourself with Shift+I or from the ReaClassical menu.
More Advanced Automation
Turn on advanced mode to gain access to all envelopes associated with the track including FX parameters. If you also need to automate various aspects of the mixer tracks or special tracks, first make them visible in the track control panel by checking the box on the desired track row in Mission Control. Use I as before.
Editing Automation Items
Select an automation item and press Ctrl+I (or right-click on it) to edit its middle value and optional ramp in and out values. You can adjust the positioning by left-click dragging on the item itself. Adjust the middle value length by alt/opt-click dragging on automation item edges. Alt+D and Alt+E show and hide automation lanes, Shift+← and Shift+→ move between automation items and Ctrl+Shift+↑ and Ctrl+Shift+↓ move between envelope lanes.
Screen reader users (Clara)
Insert Automation (I) and Edit Automation (Ctrl+I) open keyboard-driven windows, the Automation Navigator and Accessible Edit Automation, in which you move between tracks, envelopes and values, and hear the level you are choosing while you dial it in.
General Mixing Workflow Suggestions
- Set piece-by-piece "scenes" using the Mixer Snapshots Manager adjusting mixer tracks, aux and submix controls and any FX parameters.
- Make temporary adjustments (for example, volume of spot microphones etc) via the automation function I on tracks with items.
- For spot microphones that should be mostly muted: 1. Use a time selection + I to reduce to lowest value (-150dB/-inf) for the whole piece or use edit cursor + I at the beginning of the timeline to affect the whole project. 2. Use further time selections + I to set required values and any ramping in and out.
Tip
Remember that the mixer tracks (the ones starting "M:") are fed by the destination and source folders you see in the arrange window. In other words, any automation you add to destination or source tracks will be filtered through the mixer track state. As an example, if your violin spot microphone channel is set at -5dB via automation but the violin spot mixer track fader is at -40dB, the actual output will be -45dB.
Mixing for Dolby Atmos Using Fiedler Plugins
If you have the Fiedler Beam plugin on your system, use the Mission Control Enable Atmos that appears to add RCFader plugins and Fiedler Beam plugins to every Mixer track as necessary. This will also pass the current mixer fader values to the RCFader plugin. Subsequent presses of the button will check presence of RCFader and Fiedler plugins, and relative position between them, and synchronize fader values. Use Disable Atmos to deactivate both RCFader and Fiedler Beam plugins on every mixer track.
Mixing with Outboard Gear
Use the Mission Control HW Outputs to set direct connections to hardware either automatically or manually. If you do not need connections to RCMASTER, disable using the dedicated button in the main Mission Control window. Ctrl+Alt+Shift+T toggles the mute on RCMASTER's own hardware output sends (it mutes all of them if any is unmuted, and unmutes only when all are muted), and Alt+K is Panic Mute, which silences everything that can reach your hardware outputs.